
In This Issue:
- Cover Story – COMING SOON New German Made UV-LED Lamp.
- Update – Instrument Update – Echometer 1076 Data.
- Application – Electrical conductivity. 6 factors to pay attention too.

COMING SOON
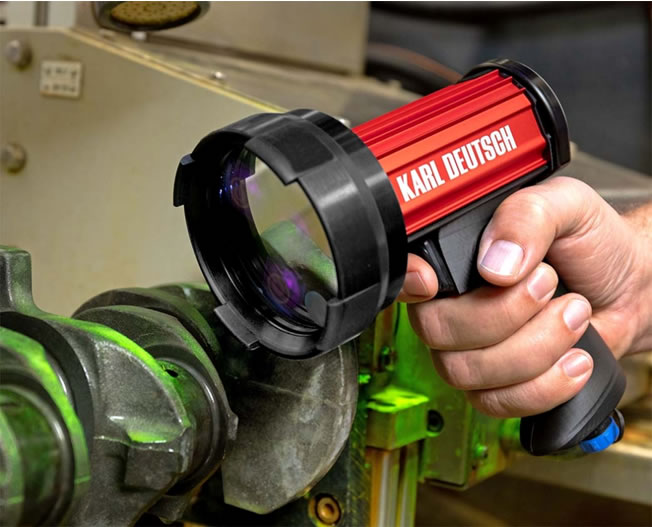
Portable UV & White light LED Lamp – Battery or Mains Powered
Completely Developed & Produced in Germany
Description:
- Robust aluminium housing with Protective rubber ring around LED head.
- Lightweight design with Ergonomic handle.
- Automatic switching between UV & White light – White light portion <5 lux with mirror filter.
- Protective switch-off in case of over temperature.
- Battery or mains operation.
- Constant irradiance (battery operation).
- Satus LED red/green.
Specifications: (Expected):
- Power consumption 15 W
- Weight 700 g (incl. 100 g battery)
- Dimensions 160 x 85 x 100 mm
- Protection class acc. DIN EN60529 IP64
- UV-A, 5 x LED Lifetime approx. 10,000 h
- Battery operating time approx. 180 min
- White, 1 x LED
- Wavelength UV light 365 nm +/- 5 nm
- UV Power 45 W/m² in a distance of 380 mm (higher performance possible on request)
- Ø 280 mm, 30° Reflectors
Kit Includes:
▪ Lamp, ▪ 4x Li-Ion Batteries 3,7 V / 3400 mA, ▪ Recharger for 2 x Li-Ion-Batteries, ▪ Test certificate, ▪ Carrying case 400 x 300 x 130 mm.

GERMAN MADE WALL THICKNESS GAUGE
ECHOMETER 1076 DATA
Review at a Glance:
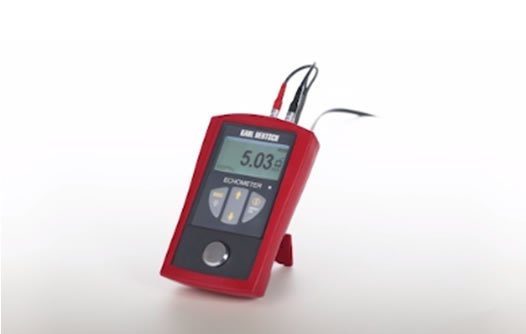
Latest technology, modern design and still Handmade in Germany the ECHOMETER 1076 Data is an innovative combination instrument for measuring wall thickness as well as sound velocity.
- Wall thickness measuring range (depending on probe & parameters: 0.5 to 400 mm
- Sound velocity measurement in the range 100 to 19,999 m/s
- Unit switchable: mm/Inch. Resolution switchable: 0.1 or 0.01
- Statistical evaluation of test results and Graphic display
- Data storage: Up to 9,999 measured values with up to 999 series of measurements
- PC interface: For PC Software and Data transfer.
- Splash-proof housing according to IP54

Electrical conductivity measurement with eddy current – Sigmatest 2.070
6 factors you should pay attention to!
What is electrical conductivity?
Electrical conductivity is a significant physical quantity that describes the ability of a substance to conduct electricity well or poorly. This information is important for example for components in the electronics industry. In addition, statements can be made about mechanical and macroscopic material properties that correlate with electrical conductivity.
The following properties can often be determined with the help of the Foerster Sigmatest 2.070
*Ageing condition of aluminium, *Strength properties of aluminium, *Accuracy of alloying elements,*The density after a sintering process
The DIN EN 50994 standard regulates the procedure for non-destructive conductivity measurement.
The following 6 disruptive factors have the greatest influence on measurement accuracy:
- Thermal effects in measurement
- Lift-off effects of the probe
- Material thickness of the test object
- Curved surfaces
- Edge effects of conductive measuring probe
- Permeability
- Thermal effects in measurement
The electrical conductivity is a temperature-dependent variable. If the temperature changes, the temperature coefficient of the material plays an important role. For metals, the higher the temperature, the lower the conductivity. For example, the conductivity of copper drops from 58.0 MS/m at 20 °C to 56.9 MS/m at 25 °C. This is approximately 0.4 % per degree Celsius.
Conductivity is usually specified in relation to 20 °C. As soon as the test object has a temperature that deviates from 20 °C, the measured conductivity can be converted to the conductivity value at 20 °C according to the following equation (DIN 50994):
σ(20°C) = σ(T)⋅[1+α⋅(T-20°C)]
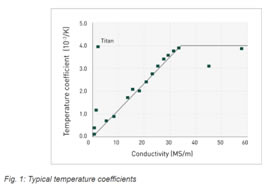
Typical temperature coefficients can be seen in Figure 1. However, some metals, such as titanium, deviate from the general trend. The values shown below were determined by the Physikalisch-Technische Bundesanstalt (PTB) in Braunschweig for 20 samples.
The compensation of temperature can be performed directly or indirectly. In a direct temperature compensation, the temperature of the test object will be measured and the formula given above with the respective temperature coefficient will be applied. The temperature can be compensated indirectly by bringing the conductivity standards to the temperature of the test object for a two-point calibration. This raises the calibration curve of the measuring system to the new temperature range.
Temperature-compensated measurements can then be performed.
- Lift-off effects of the probe
A change in the distance of the eddy current probe to the measuring surface has a great influence on the measuring accuracy. Therefore, the Sigmatest 2.070 has the function of detecting the distance from the probe to the test object and compensating for this disturbing effect. In this way, measurement on thin coatings and foils is also possible.
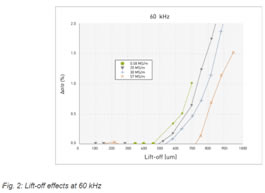
Figure 2 shows the influence of the distance between the test object and the probe on the relative measurement error at 60 kHz, using four different types of conductivity as examples.
- Material thickness of the test object
If the measured object is too thin, the magnetic field generated does not penetrate the material completely. That is to say, the eddy current density in the material is not only influenced by the conductivity, but additionally by the material thickness.
For this reason, it is essential to observe the critical minimum thickness of the measured object (see DIN 50994):
dsat = 3 ⋅ δ0
Where d0 denotes the standard penetration depth at which the current density has decayed to 1/e:
δ0 = K ⋅ (503⋅103)/√(f⋅σ)
This equation shows that high frequencies f lead to a low penetration depth (the so called “skin effect”). The measuring frequency can thus be set in order for the material thickness to be greater than the saturation thickness dsat. Likewise, the penetration depth decreases with the growing conductivity of the material. K denotes the probe type-specific correction factor, which takes into account the inhomogeneity of the coil field as well as the inhomogeneity of the test object’s material. In a first approximation, K = 1 can be set.
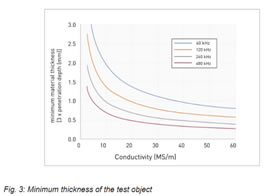
A simple test to determine whether a test object meets the requirements for minimum thickness at the desired measuring frequency can be performed using the copper standard included with the instrument. Here, the standard is placed directly under the test object and it is examined whether the probe measures the conductivity of the test object or of the standard. In the latter case, the test object would be too thin.
- Curved surfaces
Curved surfaces have a strong influence on the measured value. The smaller the radius of curvature of the measuring object, the more pronounced this influence is. In order to minimize the influence of the curvature on the measurement result, there is on the one hand the possibility to carry out the adjustment (“n-point calibration”) on a material with the same curvature. If available, the simpler option is to enter the radius or diameter of curvature directly in the device. The device then corrects the measured conductivity value using the stored relationship between measuring frequency, material and radius of curvature.
Figure 4 shows an example of the percentage deviation of the value of measurement on a special specimen made of copper as a function of the radius of curvature. The deviation is more pronounced for small radii of curvature. A dependence on the measuring
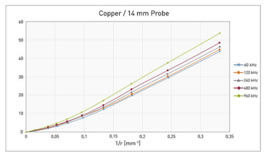
The influence of curved surfaces can be determined with a correction factor,
Example – as shown in the diagram.
smess = 20 MS/m, radius = 10 mm
convex => correction = 9 %
s tats. = s mess / (100 % – 9 %) = 21,97 MS/m
Another way to suppress the influence of curved surfaces is to use calibration standards which correspond to the test specimen geometry.
Also, for curved surfaces measurements a probe jig should always be used.
Fig. 4: Percentage deviation of the conductivity measured value as a function of the radius of curvature & measuring frequency using copper as an example
- Edge effects of conductive measuring probe
The probe of a conductivity meter is electromagnetically shielded at the edges.
Figure 5 shows a schematic diagram of the magnetic flux curve for a shielded and an unshielded probe.
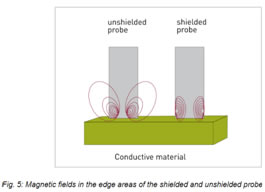
Material or magnetic fields in the edge areas of the shielded probe do not influence the measured value.
This means that a measurement with a shielded probe is even possible on the end faces of rods with only 14 mm in diameter.
Measurement in bores or milled recesses can also be carried out without error and thus, for example, better possible overheating effects on aluminium alloys can be determined with the Sigmatest 2.070 probes.
- Permeability
A prerequisite for error-free conductivity measurement is that the material under investigation is not magnetisable.
Even a low permeability of the material can lead to significant errors in the conductivity measurement.
FOERSTER’s product solution for electrical conductivity measurement;
Sigmatest 2.070
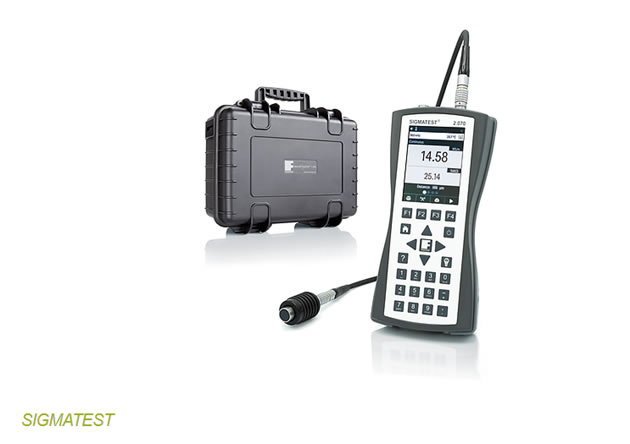
FOERSTER has been the market leader for years when it comes to fast, simple and accurate conductivity measuring instruments. With the SIGMATEST, FOERSTER has an established and reliable measuring instrument in its portfolio designed for measuring electrical conductivity. As a case in point, the SIGMATEST is approved for many maintenance applications including Boeing.
In industry, it is used in the quality control of manufacturing products, the testing of material combinations, and the sorting of metals, alloys, or recyclable materials. The determination of heat damage and in-process inspection in manufacturing and processing in metallurgy are additional fields of application. call KK&S INSTRUMENTS for pricing.


